Rabbits Manure

I raised meat rabbits on the farm. I got my rabbits at the first small animal and bird sale I could find the very first spring on the farm.  They have been with us the past 14 years now. I range between three breeding does with one buck to six breeding does with two bucks and anywhere in between.

One of the things should never overlooked on the returns for keeping rabbits is their manure. If you garden, its outstanding manure. Its a cold manure in the sense that you do not have to compost their little pellets before use in the garden.

From my reading it would appear that it is Typical N.P.K. analysis of 2. 1. 1.  It can be used directly by just taking the dry rabbit poo and putting it on top your soil and then lightly mixing it in and just going from there. I am willing to do this in my flower beds and in my gardens in the fall so that it will have the late fall and winter to break down.

I personally do not do this directly in area’s that I will be growing my fresh eating plants. I prefer to do a quick compost of the poo before using it in those garden beds, or if I need it faster, I make a bucket of manure tea.

Because I have outdoor rabbit hutches that are year round use, I have quite a pile of a mix of rabbit poo, straw bedding and bits of hay. The straw is from their back sleeping area’s but they always get some thrown out and down.. The hay is because I give them free choice hay in winter to snack on daily. plus they are messy creatures and there is costly rabbit feed in there as well..

This means that these piles are self composting in place, filled with worms and in the spring I will let the chickens dig in these to help make the top loose and workable and I then take it away to finish composting it and then let the chickens back again..  It does take a bit of time but done daily, it adds up to a good amount of workable compost in a pretty fast time overall.

So lets get back to the manure tea. I take one of my six gallon buckets. I added in two big shovel full of the premixed by the chickens of the composting rabbit poo but also took the freshest that day rabbit poo (I want that fresh poo because its loaded with microbes) Then because I could, I took out two shovels of one year composted chicken-duck compost. That pile had been done over the summer and late fall and had been composting out for six to eight months give or take.

Both of these are very rough composts and compared to what I see on the net, would have everyone in bit of.. but its not ready.. and that is my point in this post.. at least for the rabbit compost or the direct rabbit poo.. its always ready!  Its normal for the poo pellets to float when freshly stirred. they will break apart quite quickly as it works its magic.

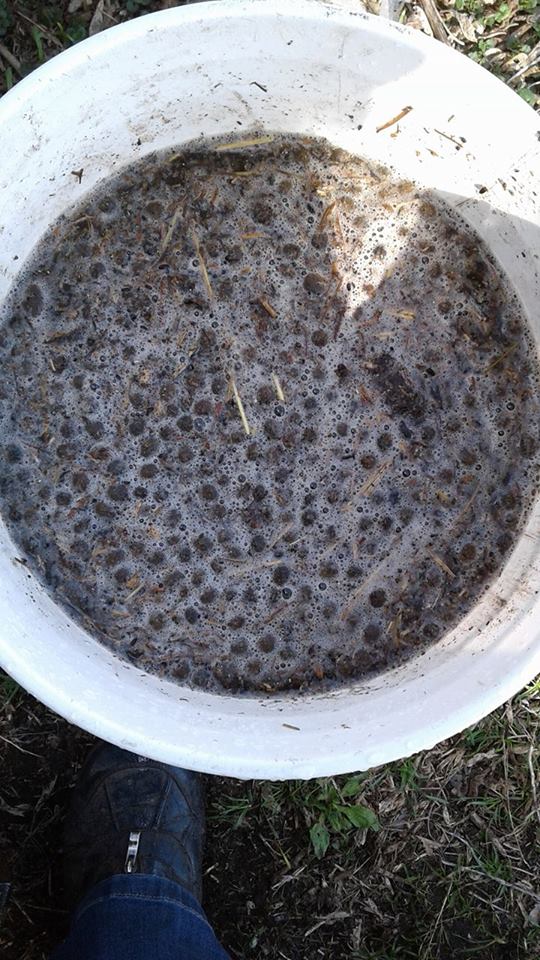
I added four gallons of rain water to the bucket and gave it a stir.. I stirred once a day for three days and then strained it.. all the bits went back to the compost pile.. the liquid was  split between two five gallon buckets and then topped up with water to the four gallon point in each bucket and used on my berry bushes.

If you have rabbits on the farm, I am willing to bet that you use their poo in your gardens already but have you thought about it as a way to make a little extra money?

At least locally, a 3/4th filled mix of raw rabbit poo manure blend is worth ten dollars when picked up at the farm. Its a good little seller to the local gardeners in our local towns and city.

Posted in 31 Day Self Reliance Challange, rabbits | Tagged , , , | 4 Comments

What do you use clover for?

I like clover! I like white clover and red clover, I can remember as a small child the pleasure on a warm sunny summer day to pick big fluffy heads of the most wonder purple and sucking on the sweet at the bottom of each tiny flower nub..  I have never been quite sure why red clover is called red, as the flowers are purple to my eye..

Clover in the pasture was a good thing, clover pulled and tossed to the chickens or given out to grandpa’s rabbits, would make critters cluck and coo or nibble in the most happy way.. but my mother never used clover in the kitchen that I am aware of.

Credit for the first time I had homemade clover tea goes to Miss T back when she was my roommate just as I hit my 20’s,  and I have never looked back, I missed clover something fierce when I lived in the artic and there was none.. no clover flowers for years in my life, I traded them for a different world view and culture and don’t regret it, it has helped make me who I am.

But now that I am back on a farm again, I seek out and grow my clover patches, some white, some red, some a mix of both, I use it as a green cover, I use it for bird feed, and for six months of the year, some is picked for the rabbits daily greens, I dry the flowers for my own use and I make at least a batch  or two of clover flower syrup. This is special to me, no using it one pancakes or icecream or as a meat glaze.. not this one..

Its used for when I have a cold, I mix up a couple tbsp of this with hot water and sip away., its a wonderful  sweet flower with nutty undertones

This is a basic flower syrup but I have a few helpful hints to make sure it turns out the best possable for you.

  • Pick your flowers early in the morning, and be picky about them, you want young just coming out flowers with no damage or brown on the bottom of the flowers. yes it takes time to hand pick the flowers and you will need a good size patch of them.
  • Pick your flowers when they are dry, not wet from rain or dew
  • Pick only from patches you know have not been sprayed
  • Don’t overpick your patch, no more then half at any given time.
  • Use good quality water(I know, I know this one seems basic, but not everyone has the right water in their home wells to make good canning products!)

Clover flower Syrup Recipe

  • 4 cups of flowers (all Red, all White or a mix of both)
  • 2 cups of water

Put your flowers after carefully checking them over, and removing any green leaves or stems or brown spots on the flowers into your steel pot, cover with water and bring to a slow soft simmer for 20 min by which time all color should have leach out of the flowers, and you will be left with a very pretty yellow fresh flower tea.

Measure out your water, it should be two cups, if you want to use it right away, just bottle and cool and add honey or sugar as you use it, if you want to perserve it for winter, its a one to one rato is what I use.

So back into the cleaned steel pot goes the two cups of flower tea and two cups of sugar, bring to boil and simmer for two min, and then jar and process the pint jar for ten min and cool and store in a cool, dark place.

So you make clover flower tea? Do you dry clover? Do you make syrup and have a favorite way to use it?  Do you grow clover as a ground cover?A green Crop for the garden? or how about a big old patch for your smaller barn critters?

Posted in 31 Day Self Reliance Challange, Food Production and Recipes | Tagged , , , | 1 Comment

31 Day Self Reliance Challange Week One Overview


Week One Overview

Well, its been a busy week here on the farm, we have been working on the house, the yard, the gardens. We had company come and visit the farm and we had the STORM. The weather this year so far has been quite the challenge in many ways. So much snow, the ice storm, now a major wind storm. A very long slow start to spring and then suddenly summer heat!

Things that we got done over the past week.

  • Butchered out the grow out rooster pen
  • Dried a full load of early spring stinging nettle for later use in the year
  • Cleaned up in the Main Garden
  • Worked on spring cleaning in the house itself -Purged just over 50 items that we do not need on the farm, some went to the garbage, most went to the local second hand shop for a second life off the farm.
  • Made Bread twice this week, once for the household use an once for company
  • Went though three pantry shelves and did a full clean and check on items

Some of my favorite posts over the past week from the fellow bloggers

www.theselfsufficienthomeacre.com/2018/05/how-to-harvest-and-use-curly-dock.html

I had shared a dock post this week on how to make a lovely cream sauce with it, but I really enjoyed reading Lisa’s much detailed post on ways to use Curly Dock.. Do check it out.

On the food front, I really enjoyed Nancy’s post on Roasted Tomato Soup

https://nancyonthehomefront.com/roasted-tomato-soup-with-spinach-pesto/

I am interesting in trying it with fresh spring greens in the pesto part.. it just sounds yummy!

My official week one favorite post that got me working on my spring cleaning and check in the pantry came from Candy’s Farm House Pantry Post.. A great overview on “Basic Food Storage” www.candysfarmhousepantry.com  Basic Storage

I enjoyed reading all the blogger post goals for the challenge and I look forward to sharing different bloggers posts that I liked reading over the coming weeks 🙂

We would love to have you join the challenge and share your own steps to self sufficiency . Follow us and share your self reliance methods, tips, goals, and dreams! Be sure to visit the other bloggers and read about their self reliance journey! You can follow along each members blog or other social mediums be it Facebook, twitter or more.

If you would like to join in this challenge, please go here to fill out the form on her site

Please check out this outstanding bloggers that are joining in the challenge. More might join as we go along.

Lisa Lynn – The Self Sufficient HomeAcre

Maria – Maria Zannini

Frank – My Green Terra

Shawnalee – Homegrown Self Reliance

Ashley – Practical Self Reliance 

Candy- Candy’s Farm House Party

Robin- A life in the wild

Kathi – Oak Hill Homestead

Nancy- Nancy on the Homefront

AnnMarie- 15 Acre Homestead

And myself.. Just another day on the farm 🙂

I will be writing new content for this challenge. However I am also going to bring out of off my most popular homesteading and related posts over the blogs seven plus years history. We are asked to do a one week round up and sharing of other blogs favorite posts, I am looking forward to getting to know these new bloggers. We never stop learning 🙂


Posted in 31 Day Self Reliance Challange | Tagged , , , , | 3 Comments

Coltsfoot-Flowers and Flower Stems

The first flowers of spring locally have arrived, our Coltsfoot is up and in full flower, the flowers rise out of the ground on them stems coming many weeks before the leaves will show themselves.

I picked a full cup of tightly budded flowers to make a lovely homemade cough syrup to help with my cold, I washed the flowers with luke warm water, giving them a good rince and then packed a full cup of them into a liter glass jar, and filled it with 2 cups of fresh boiling water, and let it steep for 20 min (if you are using dried flowers from a health store, I would let it steep 4 to 8 hours) but as I am using fresh, I don’t feel the need to let it steep that long.

I drained my Coltsfoot flower tea though a strainer layered with cheese cloth, and into a steel pot and at a VERY low simmer, I reduced it by half from two cups to one cup.

Measure your liquid and match it with raw local unpasturized honey into a pot and bring to a boil, and then pour into a clean hot glass canning jar, let cool till room temp and then store in the fridge,  I personally don’t use more then six tsp per day and only use for limited time.

If I wanted to make this to keep for later use in the year, I would also add 1/4 cup of high quality vodka to help in the preservation. If you want to make this into cough drops, you must used the sugar instead of the honey to do so, follow any basic Candy recipe using the reduced tea as the base liquid.

I personally find the taste to be very reasonable, its got a flowery hint to it, with a slight bitter.

This plant has mixed reviews, some folks don’t think it should be used at all but on the other hand it has a history of medical use in China for 2000 years and now has many recent studies in that country backing that its very good for helping in regards to colds and sore throat.

So, I am not going to recommend it as safe, but instead use with care and do your own reading and decide for yourself on if you are comfortable with using small amounts or not! Please do not eat raw! I only use it when cooked and only in small amounts.

http://www.herbal-supplement-resource.com/coltsfoot.html

Do any of you use Coltsfoot? and if so, how do you use it?

Posted in 31 Day Self Reliance Challange, Herbs, Personal Care, wild foods | Tagged , , | 2 Comments

Storm possable

Hello Folks, they are calling for a quite nasty storm already hitting much of southern Ontario and heading my way, high winds up to 110 km an hour, hail, rain, possible flooding, with high risk of things being blown over, down etc leading to power outages.

just in case I go missing over the next few days if out of power, I am setting up auto posting of some popular blog posts. Everyone local, stay safe.

Posted in Life moves on daily | 8 Comments

Sunchokes

As promised here is the full sunchoke blog post 🙂 that was talked about in my newly planned Fodder garden

Just another day on the farm's avatarJust another Day on the Farm

Yesterday in the bitter cold, we dug up a few plants worth of Sunchokes.

P1060351

Qouted from this site

Sunchokes, the vegetable formerly known as “Jerusalem artichokes,” are the tuberous roots of a native North American plant in the sunflower family — neither from Jerusalem nor related to artichokes — originally cultivated by Native Americans. The Oxford Companion to Food says that the plant was noted in writing as early as 1603, when Samuel de Champlain (the same guy Lake Champlain is named after) described the root as tasting “like an artichoke,” ostensibly starting the naming confusion that has plagued the vegetable since its European debut.

Things get even weirder, etymologically speaking, because in much of Europe, the vegetable is known as topinambour (or some variation), a corruption of the name of an indigenous Brazilian tribe that was on “tour” (I won’t even comment on that one) in France at the…

View original post 636 more words

Posted in Life moves on daily | 2 Comments

Planning a new livestock Fodder Garden

The biggest move over will the comfrey, I have at least 15 plants to dig, split into two or four and replant them. I will be replanting 30 to 40 Comfrey plants into the this new fodder garden.


This will still leave me my main two rows of comfrey for use this year but it will up the production in a massive way on this plant on the farm.

I want to be able to take out many more baskets of freshly chopped comfrey leaves for the farms livestock. I still need to produce enough to do all the garden use I do. This area is one of the few that its spreading habit will be a good thing.

When I have enough I feed it out typically at these rates The chickens get 3 oz per bird per day, the piglet get a pound per day, the weaned lambs get half a pound per head working up to a pound per day, the milking rabbit does get a leaf a day and the milking sheep a goat can get up to two pounds per day.  Comfrey is a plant that has a long history as fodder plant.

The second big row that is having a line of transplanting will be nettle roots, Nettles are outstanding as livestock feed for use in winter and or use with my milking animals. This area is not for fresh use, its totally for harvesting, drying and outside summer use. I have enough now to meet my fresh needs, the household year round needs, and the garden-livestock fresh summer needs.

What I need is more dried for livestock needs and I need to have a larger area so that I can start digging a percentage of roots for livestock use.

The third row will be digging out my current Sunchokes patches and doing a clean up and replanting of all those extra roots that will create the 3rd row in this fodder garden. I am going to share a great post I did on Sunchokes back in 2016.  I am after the greens of this plant for fall fodder and the roots for barn use into fall-winter as fodder.

The last row in the area will be a annual.. sunflowers. Black Oil Sunflowers.  I have grown the big Russian sunflowers on the farm over the years but I want to increase the Boss use on the farm as a fodder, so I will be adding in a second sunflower growing area.

These four will be the backbone of the new fodder garden. The best perk of these is that it will not cost me a dime to do the planting of these. I have all the plants, roots, and or seeds needed on the farm or in my current seed storage. That is outstandingly frugal in its own right.

This post is part of the 31 day challenge on what are we doing to increase our self reliance, the most I can grow, harvest and use fodder that is raised on the farm, the less I need to buy off the farm.  What will it cost.. time of course

Still the plants are at the point they need to be split, or dug and replanted so this is just taking a job that already needs to be done and turn it into very productive replant that will return year after year.

What do you grow on your homestead that is used to help reduce costs and feed your livestock? Beyond the normal of pasture or hay or if you really have a larger farm, your own grains. For those that have limited land, we need to get more creative on what we grow to help in this way.


Posted in 31 Day Self Reliance Challange | Tagged , , , , , , , , | 2 Comments

Dandelion Flower Fritter Balls Recipe

Just another day on the farm's avatarJust another Day on the Farm

Ok so Dh had a busy morning, it had started to rain, I had made the bread, another batch of nettle tea, had the lilacs in their jars or in the drying trays, same with the spruce tips, and hoping the rain would be enough that we would not need to water in the newly planted rows and Dh decided it was a nap time.

So I snuck over to Farmer T’s for an hour and on the way home, could not help but notice and admire the awesome perfect Dandelion flowers on the way home, somehow a dozen the biggest and most perfect were picked and brought home with me..

2012-12-24 238 (500x375)

Soon the kitchen and our tummies were enjoying the yummy taste of little bitty fritters..

2012-12-24 241 (500x375)

This recipe is so easy, that I am not sure it should be called a recipe, and in order to make it the way…

View original post 200 more words

Posted in Life moves on daily | Leave a comment

Preparing Dandelion Flowers for future use

Dandelion flower are lovely to use in a number of ways. You can add them to honey to make Dandelion honey. You can add them to butter. You can add them to dough and make cakes with them or mini doughnuts. You can use them to make Tea or in meat glaze.

The key to really enjoying this amazing flower in so many ways is the careful prep work that needs to be done to harvest the flowers. Far to often folks will tell me they tried them and found them bitter.. that is because they often dip the whole flower in batter and fry it as that seems to be one of the most popular things you will find on the net as a way to try them.

The problem with this is that green is left on the flower itself and that is where that bitterness comes in. It certainly will not hurt you in any way.. after all we can and do eat the leaves as greens, fresh when young an tender and blanched when older. That is the issue by the time the plants are in full flower, the greens are in full mature stage and therefor if you were going to use them, you would be at the blanch stage.

So in order to enjoy the rich and full bodied taste with its sweetness in regard to the flowers they must be prepared properly, it does take time but its not that bad as long as you are working with nice big flowers, it adds up fast in the bowl.

Step one -Pick Flowers, if possable pick in the morning but after the dew has come off, you want the flowers open but still fairly tight together, if you pick in the heat of the afternoon, they will be more open and just a touch harder to work with,  This photo shows what I consider a perfect picking flower. After picking let them sit for ten or twenty min to help get the bugs out.

Now the more green you have, the more undertone of bitters to the dish you will get, so here is me showing how i pull the flower part out and leave the rest behind.

lovely pile of sweet flower petals waiting to be made into syrup, jelly, mock honey or in this case, put into a jar of honey itself for later use.


Leaving you with a mass of lovely flowers bits..

Fill a glass jar, be it either pint or quart, boil your kettle and pour boiling water over the flowers, push the top ones down with a spoon and allow to sit overnight (you can do it for a min of four hours and go but I prefer to do it, cool and then store it in the fridge overnight) I strain the flowers out the next morning..

Measure your liquid, then get out your Powdered Certo box, find your basic Jelly Recipe and follow the amounts given. Please use the powdered Certo -not the liquid kind.

The second way to make it is to make a simple syrup, which is one cup of sugar to each cup of flower water, bring to a boil, simmer at the boil a min of 3 min.

Follow all regular canning rules, clean your jars, heat your jars, fill with just boiling syrup, clean the lip, put the lid and ring on, just to finger tight and then water bath can for 10 min before cooling and storing them.

The syrup works in many way, can be used to make a lovely flower tea, can be used in bases for salad dressings or used for meat glazes. This post is a mix up of three older posts on this very subject. I re-used photos from a number of other years.  I am sad to say that its to early here on the farm for flowers yet but I know that many other places will have their lovely first spring flowers to use.

I will be doing second follow up post of how to make Dandelion flower Fritter Balls.. Enjoy exploring this “amazing” weed in your kitchen 🙂


Posted in 100 mile diet, 31 Day Self Reliance Challange, Food Production and Recipes, frugal | Tagged , , , , , | 3 Comments

Wild Violets Uses

There are folks that consider these weeds as they freely grow in my local area, so I would consider them a “wild” harvestable food. The perk of this, is that you should be able to find yourself some of these for free to transpant back into your own yard and garden.

Warning: These hardy plants spread rapidly, and so plant them where you can mow around the edges or in a area that you don’t mind if they take over as a lovely ground cover. They do well in shady areas under tree’s but are tough enough to handle most conditions. As with all edible flowers, use ONLY varieties that have been organically grown and never sprayed – and do not eat the African violets, they are not the same as wild Violets.

Leaves are heart shaped attached to long petioles, Five petaled purple or blue flower with white centers. Spread by short, branching rhizomes, typically in bloom from May to June in my  %a garden zone.

According to “Stalking the Healthful Herb” by Euell Gibbons, violets are “nature’s vitamin pill” containing 150mg of vitamin C per 100g of blossoms, three times the amount of that in oranges weight for weight.

Both the leaves and the flowers are available for use. I do not eat the leaves personally but I use them a lot in my healing salves

When making Violet Tea used fresh or most often dried.  I use a 2 to 1 portion, so 2 tsp of dried leaves to 1 tsp of dried flowers. The flowers are in bloom for a very limited time. If you are going to make the tea, cut and dry and then crumble them for rest of the year use will work well.

Wild Violet flowers and greens with a fresh dippy farm egg for breakfast

However the real treat is the flowers, there are all the regular uses, you can make them into candy Violets, you can use them as color in salads or you can put them into sandwhichs fillings for extra color and for the health benefits

You can make Wild Violet Vinager (as you can with any other safe flower) by filling a jar half full of clean picked flowers and then covering with a light white vinager (rice, white wine or white), and flip up and down once a day for three days, strain out the flowers and bottle, will keep for a full year and can be used as a flavored vinager for dressings/salads etc.

Of course you can make Wild Violet jelly or syrup,

My Basic Flower Syrup, pick your flowers and use only good quality fresh flowers, and into the jar they go, covered with boiling water, let steep for a full 24 hours, then strain and measure, I personally like to reduce my flower water by half a very slow simmer, then measure again, at this point, I make a simple one to one sugar syrup, so if you have 1 cup of flower water, you match it with one cup of sugar and one tbsp of lemon juice, boil till its a thich syrup and into hot clean jar, if you are going to use right away, allow to cool and into the fridge, if you are making for later use, hot water bath the jar for 15 min and then cool and store in a cool dry dark place, will keep at least year.

Now what are you going to do with that amazing Syrup, how about a lovely Wild Violet tartlet? Now you are going to have to be a little creative on this because its another one of those Farmgal recipes but I will do my best to share how I do it, if I miss anything, please ask.

Enough of your favorite pastry for 12 tarts, you can use basic or you can use a sweet dough recipe, both will work well.

Preheat your oven to 350 C and then take about a tsp of room temp cream cheese and put it in the bottom of the tart, press to be fairly level, drizzle in at least a tbsp or two of Violet Syrup over the cream cheese, bake for about 12 to 15 min till pastry is golden brown and the middle is bubbling hot. Find twelve of the most perfect Violets flowers you can find and when the tarts come out, carefully (they are hot) place the flower dead center, pushing gently, the syrup will be sticky and they will become a colorful centerpeice on the tart.

Allow to cool and serve on a plate with a dollop of whipping cream on the side.. this is a treat in so many ways, first its just plain awesome in taste!, second its a wonderfully dressy little show off peice for a special event or fancy afternoon tea.

The violet syrup can also be served over shaved ice for amazing slush on a hot summer day, or it can be used on pancakes or waffles, its excellent when added in to your standard lemonade, it gives it a wonderful twist on the basic flavor.

So do you have this wonderful plant in your backyard? Do you harvest its flowers for use in the kitchen? Have you found a great way to use those green leaves? What is your favorite recipes for using the jelly or syrup?

Posted in 31 Day Self Reliance Challange, food, gardens | Tagged , , , , , | 3 Comments