Salt Cured Dried Perch Fish Eggs -Seasoning

With a bit of planning and some luck (because lets face it fishing is always a bit of luck) the perch were biting last weekend and as I asked all my fishing friends, if you catch a girl with eggs, please, pretty please with sugar on top.. when cleaning them out.. save those eggs for me.

So you will have a few different recipes shared over the next while, including some that didn’t work and some that did.. and let me tell you this one did!!  I had read about salt cured, smoked salmon eggs on nourished kitchen blog and she tends to really know her stuff.

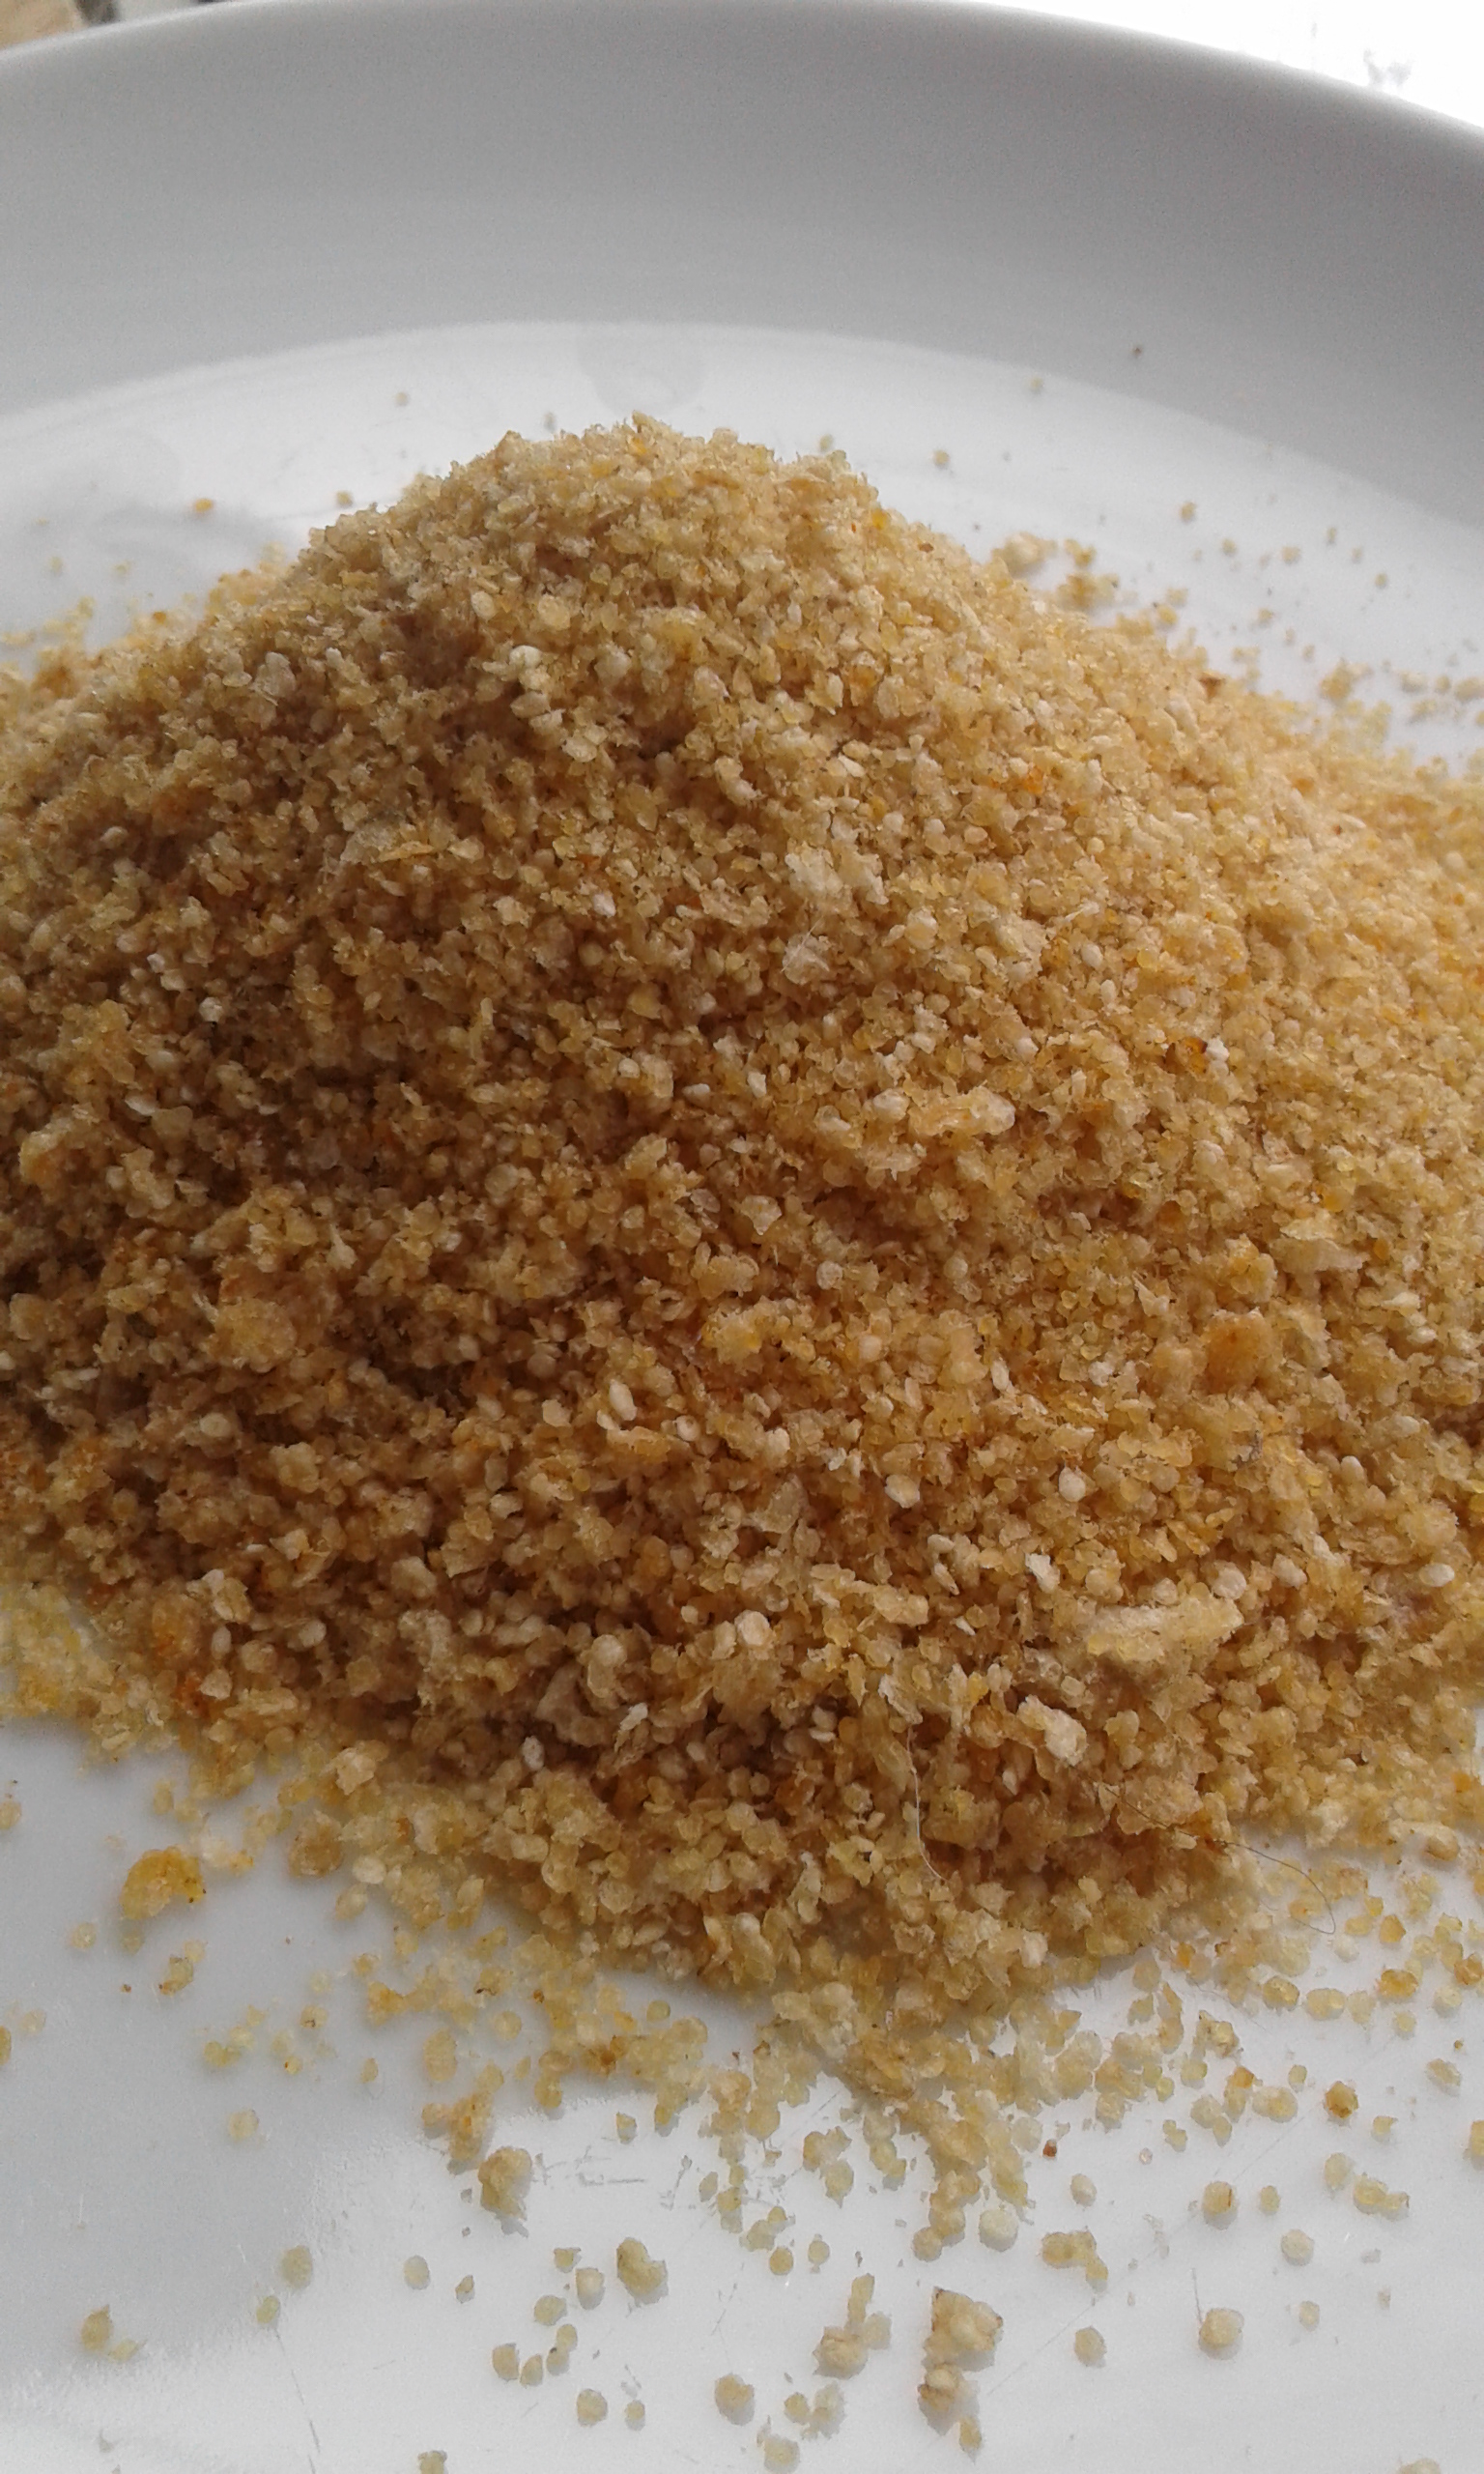
Now my eggs were so much smaller and most of them had their sacks broken during processing so I had to modify things a touch..  The end result is salty, fishy mouth watering goodness..  Love the color, and depth of flavour to this dried, crumbled “fish egg seasoning”

Only a few more days to fish before the closing of the season for spawning, I am so going to be doing more if I can..

I eat bits of it yesterday and did little dances of joy each time but I also tried it in the most traditional way last night, used as a topping for pasta.. O yes.. it’s the so good that way, I need to tweak it a bit and make it few more times with this type or that type and figure out my measurements before it goes up as a recipe..  but it will be coming

So lets back up a bit shall we..

Ideally you can see your eggs, and these need to be fresh, fresh and kept cold, they should smell fresh and light and they should look it as well. the more you can see them as each egg, the better but I wasted nothing.. its just for some of the other recipes the bigger eggs are better for this process. if they are eggs, they are good for it.

IF you them safely in their sacks, you can do can do a slower air dry on them but I didn’t have that choice, if in the sacks, they can also be given a light smoke on them.

I used 1/4th cup of canning salt mixed into a quart of cold water and I let them cure for 12 hours in the coldest part of my fridge. Per what I had read, I stayed with Glass jars and Wooden spoons and so forth, as everyone said that metal will impart a flavour. (I don’t know if true) At that point I took them out, and carefully removed the eggs from the sacks and any other bits that were attached. the cleaned eggs were put into a glass bowl and I put a plate and drained the last of the brine off.

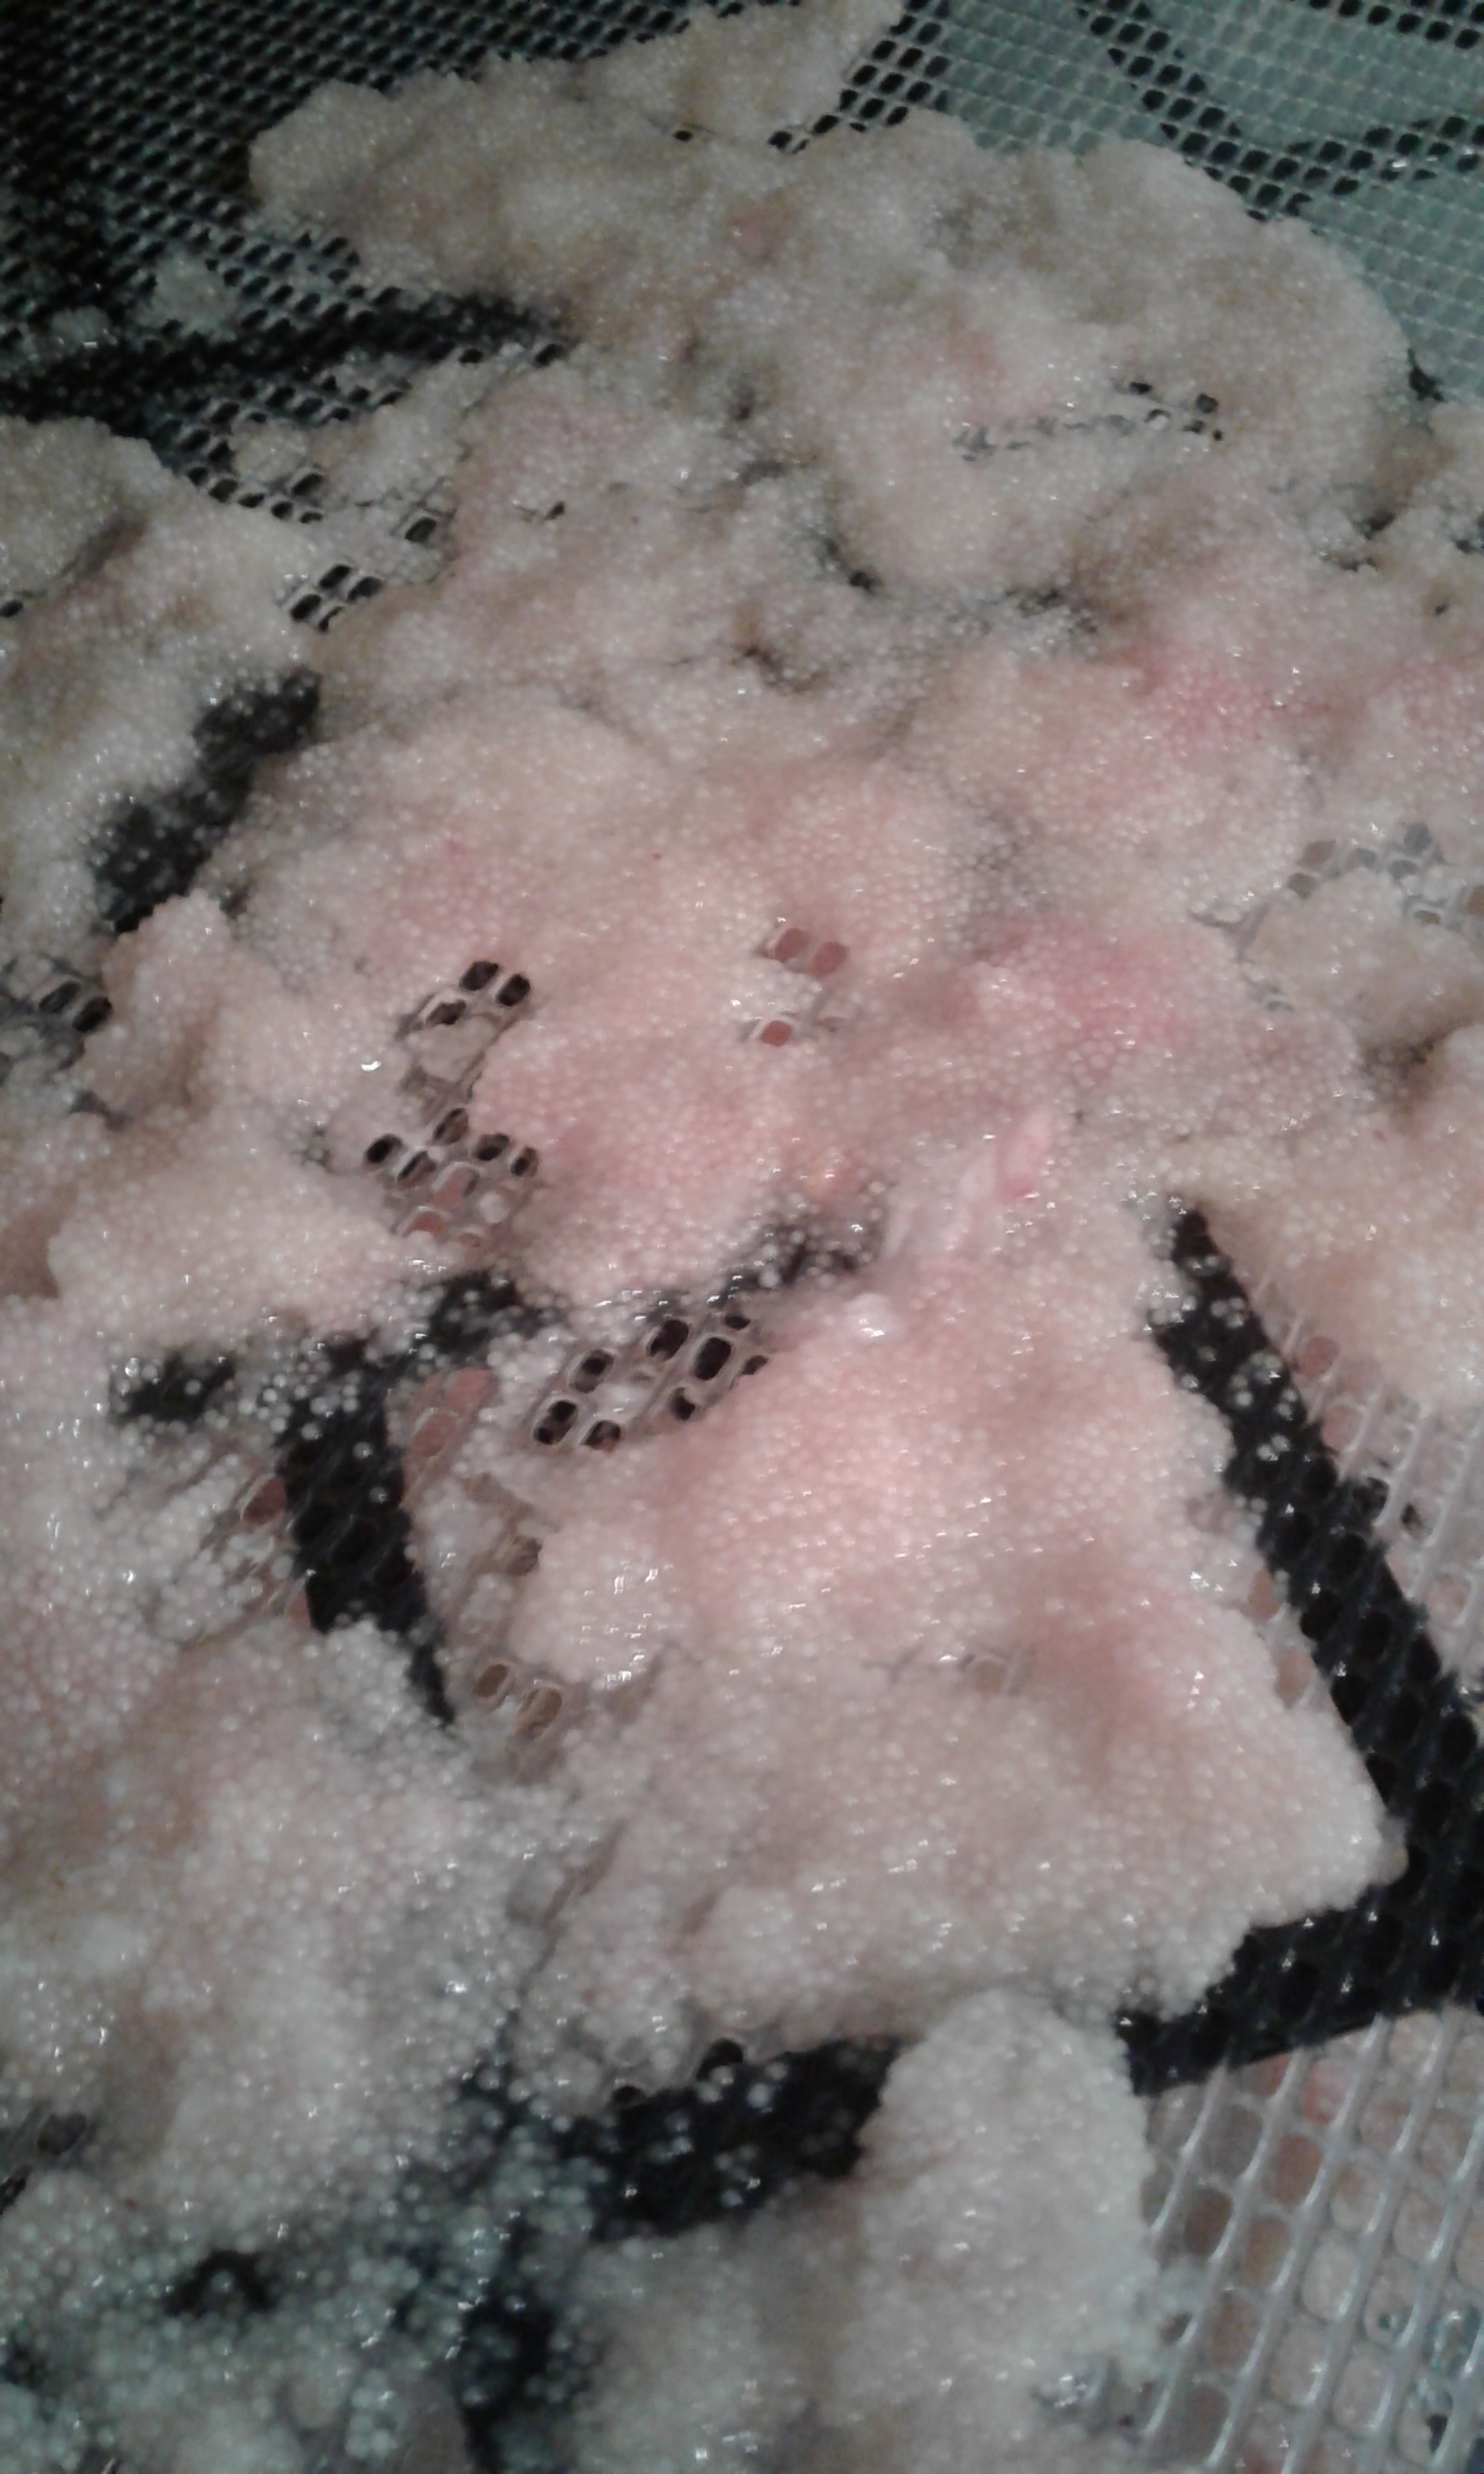
At that point I spread them on the drying trays, I think I would use the fruit leather trays next time, but live and learn.. this time I did the regular and then put down a fruit solid layer on the tray below them to catch any single eggs that dried and fell though.

I start them out on the highest setting like for jerky.. for a full hour and then dropped them down to herb setting for another five.. allowing them to fully cool afterwards.  I moved them carefully of the trays into a plastic baggy or between two sheets of wax paper would work and I ran the rolling pin gentle over them a number of times..

At that point I had a lovely finished product, dried, salted local Fish eggs, that placed into a clean dry glass jar with lids set and into a cool dry shelf.


Posted in 100 mile diet | Tagged , , , , | 3 Comments

Cabbage Rolls -Pork with Coucous Recipe

This was a half batch of six very nice large Cabbage Rolls but it could very easily be doubled for a nice big feed of four or five people. This half batch feed us supper and a full work lunch for hubby.

8 Large Cabbage Leaves whole and par-boiled to help soften them, when they turn that lovely softer green color.. you know they are ready to go.. handle with care as they are hot when they come out of their water, allow to cool just a touch before using them.

  • Half a pound of meat- In this case I used pork
  • one Large onion -Peeled and Diced
  • 1 large carrot-Peeled and grated
  • 1 tsp of montreal steak spice
  • 1 tsp of herb-garlic mix
  • 1/2 tsp of keens mustard powder dry form (or black pepper, your call)

Cook and cool slightly..

In a bowl, put a cup of Couscous and boil water, measure your one cup of boiling water and pour over and cover and let sit for five min..

Once your meat mix is ready, add you couscous and mix it up, take your leaf , place a portion of the meat mix in and roll end in, then sides then fold the top over and place in your tray.. repeat till the pan is full.

Over top that, pour two cups of basic tomato sauce and bake for 40 min till hot, boiling and the sauce is mostly gone.. Allow to sit for five before serving for better lifting.

You can serve with a drop of sour cream, or with a side salad or you can just enjoy them as the “whole” meal.


Posted in Recipes from the Root Cellar | Tagged , , , | 1 Comment

Introducing the New Doe’s

I am thrilled with my new Rabbit Doe’s, we have had lovely large breed meat style rabbits on the farm since the first spring we moved here and I expect they will continue to be here for many more years to come. Its always a good thing to bring in fresh blood every so often and when I saw these girls come up for sale from a friend of mine in the local rabbit group, I snapped them up!

Meet Choc-O-La, a lovely brown-white Broken Patterned Rex-Cross Meat  Type Doe. I love this girl for so many reason.. almost six pounds at 5 months, amazing Rex type coat.. outstanding temperament. so sweet to handle and those eyes!!!

This lovely Sweetie is Oppa-A-Daisy, she has a amazing Rex type feel and look to her coat, a lovely heavy body, and is just sweet.. sweet..

Last but not least and making me need to build another full hutch at some point in the next while is Fa-La-La, she is a total chunk of a girl, for her age, just a BIG girl and lovely standard type coat, but lots of color to her (in her to throw), good temperament and really pretty markings.

Posted in rabbits | Tagged , , , | Leave a comment

Waste not-Want Not -When things in the root cellar go.

I would love to tell you that I am always on top of the fresh stuff but sometimes we want to get something done or some things checked and it just does not happen on time.

Lots of time, we can save them in some way, use some part of them, move them into fodder food for the farm critters or just change the focus.

In this case, the beets have sprouted roots and started sprouting leaves.. nice healthy beets that are game to go to town now that they are sure its spring..

So given the amount of them at least a few pounds, I sent hubby out to get one of the bigger pan’s that at one time held Horse Mineral lick block in it and I filled it with enough soil and pushed the beets into the soil and I have a huge block of them..

Grow those greens! because I am going to steal some of them and the rest.. well, I think I might let some of them go to seed.. we will see…

How is everything holding up in your root cellars? Have you overwintered anything that will be planted out for second year seed production?


Posted in Garden | Tagged , , , , , | 6 Comments

Moose Maple Stew with Bannock Topping

When the Canada 150 Food Blog Challenge announced March’s month as Maple, I think everyone smiled!

March is sugaring season locally and I have indulged in tapping the tree’s and learning how to boil it down, I have helped friend doing it over big open fires, leading to super dark smoky flavoured syrup, I have boiled it over a clean burning wood stove and then finished it on Propane stove to get that stunning lighter first run syrup.

I felt pretty sure that other bloggers would cover the basic’s, Maple Taffy in the snow, Maple sugar, Sugar Pies and tarts, and of course Pancakes..

Locally, everyone makes super thin crape like pancakes, where I show my western roots with Flapjacks. So I had better share my favorite flapjacks recipe in case you want to try them

Our Flapjacks are high and fluffy!

My current recipe is this..

3 Cups of milk (whole), 2 eggs, 2 tbsp. of melted butter, 3 cups of flour, 2 tbsp. of baking powder, a good pinch of salt.. Mix and cook on a med hot griddle..

My mother says the traditional one is this.

2 cups flour, 2 tsp baking powder, 1 tsp baking soda, 1 tsp salt, one and half tbsp. of sugar, mix together in a bowl, then one egg in a well in the middle, large mixing spoonful of oil (approx. quarter cup) and then milk to make correct thickness of batter.

While we are talking about local fresh real Maple Syrup, its worth sharing my dear Grandmas pancake syrups recipe from the farm. They could not afford to buy Maple Syrup so Grandma did what she did best.. find a way 🙂

Two cups of brown sugar, one cup of water, bring to boil, and simmer for five min, remove from stove and add half a tsp of maple flavour, can be used hot or cold..  Very running but good flavour

The Second must have when it comes to Maple syrup.. Fried Corn Bread.. Heavenly!

This is a nice and easy recipe to make a cornbread that you are going to slice and fry up golden to be served with butter and syrup..

  • 1 1/2 cups  buttermilk ( you can use powdered buttermilk, really buttermilk or whole milk with two tsp of lemon juice in it to turn it)
  • 1/3 cup oil
  • 1  large egg
  • 1 cups yellow cornmeal flour or cornmeal
  • 2 cup all-purpose flour
  • 1/4th cup of sugar
  • 1 tablespoon baking powder
  • 1 half teaspoon salt

Mix in order, wet to be added to dry, Do not over mix, grease pan or spray it, 350 time depends on what you cook in, cool in pan, cut into squares, lift out and slice in the middle fry in bacon fat or dry or in a touch of butter till golden brown and serve as fried cornbread instead of pancakes.

However I wanted to talk about using Maple with meats.. it’s a delight to add some rich Maple Syrup and use it to make a truly Canadian Recipe.

Moose Maple Stew with a Bannock Top.

  • 1 Pound of stew cubed Moose or Venison or Lamb or Beef
  • 2 large Onions
  • 3 cloves of Garlic
  • 3 large potato – Peeled and cubed
  • 1 Large Carrot-Peeled and cubed
  • 3/4th cup of maple syrup
  • 1 tsp of fresh cracked Black Pepper (you need the pepper to cut the sweetness and add a depth of heat to the sauce)
  • 1 tsp of salt
  • 1 tsp of Montreal Steak Spice
  • 1 tsp of Salad Herb Blend
  • 1 tsp of Basil

Add the above and mix it together, then pour into your baking pan and add enough water to cover everything, cover with lid or tinfoil and bake for an hour at 350

Make a Basic Batch of Baking Powder biscuit for the top, if you have extra, bake them on a sheet afterwards, mine nicely grew together forming  a solid top.

One cup of flour, 2 tsp of baking powder, a pinch of salt, 1 tsp of sugar (if you want) 1 tbsp. of cold butter or lard or tallow and half cup to 3/4th  of a cup of cold whole milk.. it’s a tricky one, half a cup is not enough, and 3/4th  is too much but if you have to pick on, then go with 3/4th  a cup..

Cut your butter with a knife into little pats, then blend it with your fingers in the same way I taught in regards to your pie dough mixing, or use a pastry cutter, your choice, DO NOT Mix this with a spoon    Once rubbed in and all the above are mixed well together, then make a well in the center of your flour and add your milk

Mix together with a wooden type spoon till it comes together enough to clear the sides of the bowl.. Do not overmix, do not knead, do not turn out onto a floured surface and work it..  REPEAT.. just till it comes together! I know, I know but its important

At this point, you can do it two ways, you can do a spoon drop style cut and put on top of the stew (which if you covered it, would come out dumpling style) or you can just lightly flatten the dough into the shape you need, cut it into squares and move them over to the top. Bake for 30 to 40 min till Golden Brown and wooden stick comes out clean..

Allow to sit for a few min and then serve up together, ideally to be put with a green salad on the side.

This recipe is a favorite among my friends and I get asked to bring it to potlucks and get together’s I make it more often with lamb than with moose or Venison. It is sweet and savory with its own built-in Biscuit Crust.

Enjoy the spring Maple Season of 2017


Posted in Canada 150 Birthday Events | Tagged , , , , , , | 2 Comments

High Bush Cranberry- Shrub Drink for the Win

I loved this months Shrub challenge, At the Food in Jars Blog, we even had a Shrub Party.. I made four different kinds, Elderberry, High Bush Cranberry, Elderflower and Homemade Grape.

What we learned at the party

  • the younger crowd all voted Elderberry with vodka for the win
  • If you don’t like vinegar, you will not like the smell of a Shrub, even if you don’t mind the taste itself.
  • Do consider a hot Shrub.. it does not need to be only served cold!

The Winner per all the data crunched.. High Bush Cranberry Shrub, Ice Cold with Polar Ice vodka.

  • 2 Oz of High Brush Cranberry Syrup
  • 1 Oz of White Wine vinegar
  • 1 Oz of Polar Ice Vodka
  • Top up with Cold Water or Sparkling Water or Ginger Ale works as well!

High Bush Cranberries grow wild all over Canada and they say up and down the States as well, it is also grown in Europe in many places. We hunted up and down the back roads till we found a patch that we liked the flavour of the berries on and we dug out a number of the suckering babies (filling the holes back in with compost from the barn to say thank you to the parent plants, which also means that the wild harvest from the bushes have more than doubled in amounts for years to follow)

Over the years they have grown into fine bushes in our food forest area..

We like to make sure that the berries get some good hard frosts on them to help sweeten them up just a touch, and then we use the Steamer to steam the berry’s and collect the juice.

From Which I tend to make awesome jars of homemade High Bush Cranberry Jelly for the next years use. I did not save any Juice only for the Shrub Challenge but I did have a single batch I had made into pancake Syrup instead of Jelly and that is what I used for the Drinks.

Posted in Food in jars | Tagged , , , , , , | Leave a comment

Warm Baggy Method- Stage Two..

So we talked about the warm baggy method of starting seeds, that was very much focused on using it to test for seed germination rates.  A great way to check older seed from storage, a MUST for checking home grown and saved seeds and for sure checking any free seeds that have been gifted in a number of ways.


Nothing is worse then planting whole rows of seeds and wasting weeks waiting for plants to come up.

But now we can move it over to the next step if you want.. pick and choose the seedlings. As you can see the germ rate on these Brussel sprouts seeds was outstanding.. I left them in the baggy till they were turning into true wee sprouts, then I moved them carefully and planted them up into their pots..


A mear 24 hours after being planted.. they are up and looking fab! They are now set up with a greenhouse topper, under the grow lights, once they get big enough that they move from the starter shelf to the grow shelves they will remove the top. In total I planted out 30 strong seedlings, and feed 11 of the didn’t make it to the chickens bucket.

Compared to dropping two or three seeds per pot, I used a lot less seeds, so if you are seed frugal, this is a very useful tool.  (you often hear about this type of seed saving in square foot gardening books)

Now, I say that one of the perks is that you don’t get to just select your seedlings based on the true starting leaves but also on the root as well. Now is time to start your cull process.

Anything that does not have even proper true leaf was removed.. Anything with very short or with reduced root structure or the few that had very very long and thin roots was culled out.. at this stage, being part of the pack is just what I am looking for.

41 one seedlings, and I culled 11 or 26 percent of them.. we will see if all the once planted out make the grade.. I am game for all 30 but I really want 24 plants, and I am hedging my bets by doing a few extra.

I took a training course on growing plants with seed saving and plant breeding improvements and it was outstanding,  I have never looked at gardening quite the same way..

I used to garden for what was in front of me right now.. Now I garden both in the here and now but also with a eye to the future of the plant genes and what could be 🙂


Posted in Garden | Tagged , , , , | 4 Comments

Garden Plans for 2017-Spring Garden


Well, it’s the first day of spring.. and my garden’s are covered in feet of snow with sharp hard ice coverings and the ground is frozen under that..  but I know that spring is coming and I am giving this year after the drought year a hard look indeed.

You see I have been tracking my farm for 13 years this spring.. and so I have my data on what I had the year after my last drought year and it says that I will have an early spring, a very wet spring with a mini-drought summer and a very long, long fall, with a few short hard frost nights.

On the last year, the El Nino was acting correctly but this year, not so much.. the models are all over the place..  some says we are going to have back to back runs, others say no, we are seeing something but its an unknown or that it will run around the equator instead of coming up and down.

The truth is, the data is there enough to say that we will have one or the other or a middle factor..  That is enough for me to go ok..  Time to layer up the garden plans and that is just what is going to happen this year..  Now I know that most people have  a main garden area and they put a huge amount of time into picking its placement and working to improve the soil and I see the pictures.. they are so pretty..

I  mean look at my mom’s awesome spring start to her raised garden box’s, they are as awesome and I am so glad that she has them.. they grow an amazing amount of food and she collects her rain water, she has fruit bushes and tree’s in her yard and she has more pots for growing fresh food.

But me.. I am a big believer that if you have the space for it.. you should have many garden spaces! I have the garden nursery spot, the main garden, the big garden, the front garden, the food forest garden, the teepee garden, the grapevine garden, the back garden and the side garden..  and these are not small.. most of them are as big or much bigger then the average “town or community garden” each has positives and each has negatives.

This is the front yard gardens (well part of them) and it was created because its the first area on the farm to melt out, its all natural free form raised beds that are six to a foot above the soil, its shifts all the time as it composts down and this year.. the oldest beds will be turned over and into the soil and then beds remain with the mix.

(that photo is from 2016, we are not near that melted yet!)

This is the backbone of the outside early spring garden plan, I always do some colder spring planting, smaller amount that fall into the “season” extenders and I have learned a lot doing this.. but this year.. this year, its going hard core.. we are not just trialing and learning and hoping for a few bits of this or that to add to the kitchen..

Nope, this year we are going to be using the greenhouse that is going up, we will be making and using a hot compost box, covered grow area, and I have plans for a temp hoop garden. See the old farmgate  in the garden, and you see the metal climber garden.. they are both getting plastic covers that will create micro greenhouse effects and protections to really push those growing areas forward.

The biggest change for the spring garden.. intent!

Normally, I grow for fresh eating in the spring, I like to forage in the spring, its a great time of the year for it, and it does not take me long to find, harvest and dig up enough goodies to fill our plates so normally I give a tiny bit of space to some early things and then I use the rest for things that can handle a cold start and are long season plantings.

This has worked very well for me on normal years.. but as I don’t think this going to be one.. and look at my detailed records, I am flipping it..

I plan on forage to keep our fresh food plates filled.. but the spring garden is about short and fast harvests. In keeping with that, I have been on the hunt for anything that will produce within 45 to 60 days.

I am not worrying about seed saving, I am not worrying about long producers, I am after poundage! and putting up..

So what am I going to be growing?

  • Pea’s -Snow
  • Pea’s- fresh harvest
  • Pea Greens- Harvested, dried and ground for green powder
  • Radishs- Fresh for eating, Roasting, and for canning and for grated-dried use.
  • Radish greens- Dried to be used as a spice green
  • Beets- Greens-Fresh, dried
  • Beets- Canning
  • Kohlrabi- Canning -Grated and dried for soups and stews
  • Broccoli- Fresh eating a touch, but mainly for harvest, drying for soups and stews
  • Turnip- Canning -Pickled and Regular
  • Turnip Greens- Drying for soup-mix greens and for ground for green powder

That’s all the space I will have in those area’s that can be worked on.. If all goes as planned, these will be in April and harvested by end of May to replant these area’s into the heat loving plants that will all be pre-started.

Some of these will be pre-soaked, pre-started if they can be..

I will be posting and updating on how this goes!

So are you looking at your local weather patterns? Are you looking at your gardens and wondering how can you increase its production? Are you worried about a cold year, a hot year, a drought year? do you think you are going to have a average garden year, or a short one or a extended one?

What is the one thing you are doing this year that will help extend your garden growing season?

Posted in gardens | Tagged , , , , | 1 Comment

Sunday- Photo- A gentleman and his lamb..

Today has been a busy Sunday, we have had new lambs in the barn, we have moved this and that.. milking and much more going on.. so I was grateful when we stopped and took a break to work on this photo idea I had. I am grateful that my DH was winning to work with me in getting this shot..  This Black and White Hunk of love it is Top Hat, our first born Lamb of the Year in 2017 out of Tess and Hairy and Fine Wee Ram Lamb he is.

Working with animals is always a interesting thing.. working with photos and then working in photo editing is as well.. I like this photo very much but they are so very different from each other 🙂

And this one makes me laugh.. Photo bombed  by not one horse but by both Caleb and Mr. Bojangles! I know that its backlit, but I love the softness in both of the horses.. not only to do they like Hubby but they very much like each other as well..

Last but not least.. Miss Sofie posed for a photo on the way into the house.. one quick snap and she was running for the door.. turns out that one was all  I needed 🙂

Posted in photography | Tagged , , , | Leave a comment

Spring Eggs Collecting for hatching

O dippy egg, you are my favorite.. I like eggs in so many ways but I truly adore a good dippy egg fried up in home rendered duck or beef or pork fat, the edges crisp, the white set and the yolk, golden an runny.. I keep a great winter color to my hens eggs because they have daily access to a bit of hay to peek at.

But with spring comes better weather, more sun and a new purpose to my hen house.. its time to move the birds to a breeding program, different birds are in different programs, we are down to three chicken breeding programs on the farm, the Icelandic chicken (j line) breeding pair, small, outstanding layers of med whitish eggs

Salmon Faverolles, med-heavy birds that lay large eggs on the pinkish side and then my mixed breeds, med-heavy layers, they are a mix of green-brown egg layers with good size to them.

each breeding program is a touch different, one is layer only, one is purebred with the goal of heavy layers with good meat sizing and the other is all about the grow rate and meat..

What they all have in common at the moment, top line feeding of the birds, health checks, multiply egg collection checks, fresh bedding touch up all the time, because you need the cleanest eggs possible, daily records out of the pens, egg checks and egg culling, twice daily turning while waiting at room temp.

Yesterday the temps went up above zero during the day, it was plus one with sunshine and the birds were all out in their outside pens, soaking in the sun, breeding like mad and they are starting to lay.. 9 eggs out of 12 hens yesterday..

So this week, we will start collecting, not sure I will make my 48 eggs in 7 days but it will be close and I can always fill the extra space with a friends eggs if needed.. Keep you posted 🙂

The Turkey, duck and geese have all been moved to the higher breeding-laying-setting rations, from their overwinter lower protein rations and feeding programs


Posted in Chickens | Tagged , , , , , | 3 Comments